Difference between revisions of "DE4A SSI Authority and Edge Agent"
(Added initial structure of the page.) |
(Added functionality descriptions for the Authority Agent.) |
||
| Line 1: | Line 1: | ||
==Introduction== | ==Introduction== | ||
| − | The SSI | + | The SSI Agent infrastructure is established through the use of the SSI Authority and Edge agents. The SSI Authority Agent is an enterprise-level solution to be deployed on the premises of organizations that act as diploma Issuers (Data Providers) or Verifiers (Data Consumers), while the Edge Agent is a mobile solution, which can be used by the end users (in case of the SA pilot, students) to interact with the Authority Agent.<gallery> |
| + | File:Conceptual view of the DP technical flow..png|alt=Conceptual view of the DP technical flow.|Conceptual view of the DP technical flow. | ||
| + | File:Conceptual view of the DC technical flow..png|alt=Conceptual view of the DC technical flow.|Conceptual view of the DC technical flow. | ||
| + | </gallery> | ||
| − | == | + | == SSI Authority Agent == |
| − | |||
| − | |||
| − | |||
| − | ===Supported interaction patterns=== | + | ===Functionalities provided=== |
| + | The main purpose of the SSI Authority Agent is to provide functionalities related to establishing a DID connection between the Hyperledger Aries agent deployed on the organization's premises and the user's Edge Agent as well as issuing the user's diploma as a Verifiable Credential (Data Provider) or request and validate the submitted diploma in the form of a Verifiable Presentation (Data Consumer). The Authority Agent also facilitates the communication with EBSI ledgers for storing the information about the trusted diploma issuers and their EBSI-compliant DIDs used for digitally signing the issued verifiable credentials and validating the issuers of submitted verifiable presentations. | ||
| + | |||
| + | ==== Generate and issue an EBSI-compliant DID for the organization ==== | ||
| + | In order to digitally sign verifiable credentials for the users, which can later be validated by the Verifier, the DID used for signing must be trustworthy and publicly available. To achieve this, the information about organizations listed as trusted diploma issuers and their DIDs is anchored to EBSI ledgers, where it can be accessed by calling the DID and Trusted Issuers Registry REST APIs. This information is produced on the Authority Agent startup by the underlying EBSI Connector component, which makes sure that the necessary keys are generated and imported to the cloud HL Aries agent, so that they can be used to sign the verifiable credentials. During the VP validation, the Authority Agent is then able to retrieve and resolve the DID information from the EBSI ledgers to validate the diploma issuer. | ||
| + | |||
| + | ====Establish DID connection between agents==== | ||
| + | The first step necessary in the diploma issuance/submission flow is to establish a secure connection between the [[Evidence Portal]]/[[eProcedure Portal]] and the user's Edge Agent (i.e. digital wallet). This is done by generating a QR code to be displayed on the portal side, which includes information about the DID invitation generated by the Authority Agent. The user can use his/her mobile application to scan the QR code and accept the DID invitation. Once this is done, a DID connection is established between the two agents (specifically, between the two HL Aries agents in the background). This step is a pre-condition needed to uniquely identify the two agents that will echange messages in the later flow. | ||
| + | |||
| + | ==== Issue a Verifiable Credential ==== | ||
| + | Once deployed on the Data Provider side, the Authority Agent supports the process of issuing a diploma in the form of a Verifiable Credential (VC) digitally signed with an EBSI-compliant DID of the Issuer. The VC information is retrieved from the received diploma evidence data in the canonical XML format. Sending the Verifiable Credential produced by the Authority Agent includes sending the VC offer for the user to preview the included data, followed by actually sending the Verifiable Credential once the offer is accepted. | ||
| + | |||
| + | ==== Receive and validate a Verifiable Presentation ==== | ||
| + | |||
| + | === Supported interaction patterns === | ||
Interaction patterns define the flow of data through the Connector and the intercommunication between the different components. Each pattern exchanges certain types of messages, and the incoming/outgoing information will depend on the processes occurring in the external components [3]. | Interaction patterns define the flow of data through the Connector and the intercommunication between the different components. Each pattern exchanges certain types of messages, and the incoming/outgoing information will depend on the processes occurring in the external components [3]. | ||
Revision as of 12:11, 18 November 2021
Introduction
The SSI Agent infrastructure is established through the use of the SSI Authority and Edge agents. The SSI Authority Agent is an enterprise-level solution to be deployed on the premises of organizations that act as diploma Issuers (Data Providers) or Verifiers (Data Consumers), while the Edge Agent is a mobile solution, which can be used by the end users (in case of the SA pilot, students) to interact with the Authority Agent.
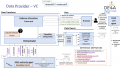
Conceptual view of the DP technical flow.
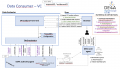
Conceptual view of the DC technical flow.


SSI Authority Agent
Functionalities provided
The main purpose of the SSI Authority Agent is to provide functionalities related to establishing a DID connection between the Hyperledger Aries agent deployed on the organization's premises and the user's Edge Agent as well as issuing the user's diploma as a Verifiable Credential (Data Provider) or request and validate the submitted diploma in the form of a Verifiable Presentation (Data Consumer). The Authority Agent also facilitates the communication with EBSI ledgers for storing the information about the trusted diploma issuers and their EBSI-compliant DIDs used for digitally signing the issued verifiable credentials and validating the issuers of submitted verifiable presentations.
Generate and issue an EBSI-compliant DID for the organization
In order to digitally sign verifiable credentials for the users, which can later be validated by the Verifier, the DID used for signing must be trustworthy and publicly available. To achieve this, the information about organizations listed as trusted diploma issuers and their DIDs is anchored to EBSI ledgers, where it can be accessed by calling the DID and Trusted Issuers Registry REST APIs. This information is produced on the Authority Agent startup by the underlying EBSI Connector component, which makes sure that the necessary keys are generated and imported to the cloud HL Aries agent, so that they can be used to sign the verifiable credentials. During the VP validation, the Authority Agent is then able to retrieve and resolve the DID information from the EBSI ledgers to validate the diploma issuer.
Establish DID connection between agents
The first step necessary in the diploma issuance/submission flow is to establish a secure connection between the Evidence Portal/eProcedure Portal and the user's Edge Agent (i.e. digital wallet). This is done by generating a QR code to be displayed on the portal side, which includes information about the DID invitation generated by the Authority Agent. The user can use his/her mobile application to scan the QR code and accept the DID invitation. Once this is done, a DID connection is established between the two agents (specifically, between the two HL Aries agents in the background). This step is a pre-condition needed to uniquely identify the two agents that will echange messages in the later flow.
Issue a Verifiable Credential
Once deployed on the Data Provider side, the Authority Agent supports the process of issuing a diploma in the form of a Verifiable Credential (VC) digitally signed with an EBSI-compliant DID of the Issuer. The VC information is retrieved from the received diploma evidence data in the canonical XML format. Sending the Verifiable Credential produced by the Authority Agent includes sending the VC offer for the user to preview the included data, followed by actually sending the Verifiable Credential once the offer is accepted.
Receive and validate a Verifiable Presentation
Supported interaction patterns
Interaction patterns define the flow of data through the Connector and the intercommunication between the different components. Each pattern exchanges certain types of messages, and the incoming/outgoing information will depend on the processes occurring in the external components [3].
The Connector currently supports two interaction patterns:
- Verifiable Credentials (VC) pattern
- Synchronous communication between the Connector and final participant (DE or DO).
- Data Owner endpoint must be known by the Data Transferor.
- Since the communication is synchronous, the Data Requestor does not need to know the identifier and endpoint of the Data Evaluator.
Most of the specific behaviour of each interaction pattern is independent of the Connector itself, as the Connector component is just designed to exchange messages and the main differences between the patterns take place in the external components such as the Data Evaluator and the Data Owner.
SSI Authority Agent roles
A SSI Authority Agent instance can play two different roles:
- Data Requestor (DR)
- Data Transferor (DT)
No configuration is needed to differentiate the roles, it only depends on the usage, i.e., the behaviour will be according to the messages sent.
Error handling
Since the Connector performs multiple communications between different external components and some data and structure validations are performed, the Connector needs to monitor all failure points and be able to identify them in order to build the corresponding messages and warnings to inform each external component. When an error happens, the corresponding component creates an error message with the information about the error to be sent back to the entity that sent the failed message.
Logging messages
Within the data flow and message exchange, there are many key points where it is important to know how the data is being managed, as well as identifying intermediate errors and unhandled system states. In this respect, the Connector can send messages to a Kafka server to track the data flow and trace the state of the system at certain points.
This feature is an advantage from a technical and business point of view, as the Connector performs the message exchange transparently to the other components.
It should be noted that the messages sent to the Kafka server are hardcoded, it is not a parameterizable feature, so any enhancements must be hardcoded again and deployed. It has been developed in such a way because the necessity of a Kafka server is not expected outside the DE4A project. In a real scenario, an alternative way of collecting logs should be implemented.
Message types
The Connector implements a Kafka message producer through the de4a-kafka-client library of the de4a-commons package. This producer provides several types of messages or severity levels:
- Success
- Info
- Warn
- Error
- Fatal error
Those message categories can be easily used to specify the severity level of the message sent to the Kafka server to track and identify them.
List of messages
The messages currently sent from the Connector to the Kafka server are as follows:
Services – (Info level)
- RequestTransferEvidenceIM message received - RequestId:
{0}, CanonicalEvidenceType:{1}, DataEvaluator:{2}, DataOwner:{3}
AS4 – (Info level)
- Sending request message via AS4 gateway - DataEvaluatorId:
{0}, DataOwnerId:{1}, CanonicalEvidenceType:{2}
Errors – (Error level)
- The corresponding request to the received response is not found on database - RequestId:
{0}
[1] The {x} symbols are placeholders for dynamic text to be logged.
Data management
The Connector stores and manages certain information such as DE endpoints (not to be confused with SMP endpoints), DO endpoints, certain request records for asynchronous response matching, etc. All this data and where to find it is described in the following subsections.
Data Owner addresses
Once each Data Owner is publishing his Connector service information on the SMP, the request will arrive to that Connector service configured on the SMP (via the AS4 Gateway), and considering that one Connector could be serving to multiples DOs, this Connector has to know the addressing (base endpoint, without path name) information related to a specific participant identifier (e.g. iso6523-actorid-upis::9999:egov) to send forward the request to the corresponding Data Owner, so due to that, the Connector maintains a table, named owner_addresses, with two columns:
- AgentUrn: participant identifier in the DE4A format, e.g., iso6523-actorid-upis::9999:ess2833002e – see the “DE4A Policy for use of identifiers” for further information about the participant identifiers policy.
- Endpoint: base endpoint URL of the Data Owner who is exposing the service
/requestExtractEvidence
The information above will be used by a Connector playing the Transferor role when the RequestExtractEvidence message is being sent.
Technology used
System core architecture
The SSI Authority Agent works as standalone Java EE application that runs different web services according to the RESTful API architecture principles. The application is built with the following tools:
- Maven
- Java EE 16
In addition to the core architecture, the XML Schemas defined to model the exchanged information, data constraints, interfaces, etc. are also important. All this is part of the Connector core through the de4a-commons library, which contains the above-mentioned model as well as utilities and conversion tools.
- Author: DE4A (WP5)
- Repository: https://github.com/de4a-wp5/de4a-commons
Third party libraries
As part of the bunch of libraries used by the Connector there are some of the related with the core features and which represent a starting point for the functionalities provided by the Connector.
Walt.ID library
The TOOP Connector is a set of shared utility functions used in the Connector to perform common tasks that are required for a safe and interoperable data exchange. In the initial iteration the latest version of the TOOP Connector technical components were reused mainly for the usage of the built-in phase4 AS4 Gateway. Other elements of the TOOP Connector are currently ignored.
- Author: TOOP Project
- Repository: https://github.com/de4a-wp5/toop-connector-ng
Jackson
Set of Java libraries to build Java web applications.
- Author: Philip Helger (phax)
- Repository: https://github.com/phax/ph-oton
Peppol commons libraries
They include the SMP client library used by the Access Points to retrieve service metadata. This library supports the Peppol SMP specification, the OASIS BDXR SMP v1 and OASIS BDXR SMP v2 specification. This project uses Apache HTTP client to perform the REST lookups on foreign SMPs.
- Author: Philip Helger (phax)
- Repository: https://github.com/phax/peppol-commons
Data management
To manage the model and the data stored by the SSI Authority Agent the following technologies are used:
- Ektorp: The Java Persistence API is a specification of Java. It is used to persist data between Java object and relational database. JPA acts as a bridge between object-oriented domain models and relational database systems. As JPA is just a specification, it does not perform any operation by itself.
Utilities libraries
The project uses several libraries and utilities to process and transform the data. They can be divided according to their nature:
- Commercial libraries
To perform common and non-business operations on web and data exchange projects, the Connector uses different commercial solutions, also all the libraries embedded in the Java development kit.
- In-house solutions
The Connector project includes some utilities that allow the data processing and internal tools to perform all the Connector tasks. Those utilities are within the Connector project as a module called de4a-commons.
Installation and configuration
Installation
//TODO: enter information from the WP5 Github.
As a prerequisite to build the Connector is to have at least Java 11 and Apache Maven 3.6 or later installed.
You should be able to compile entire packages from the parent POM file:
mvn clean install
It is also possible to compile each package separately by browsing to the folder and running the command above.
Package
The compilation process will be packaging the project into a .war file located on /target/ path, which should be deployable on any applications server. If you compile the parent pom, the IDK and Connector target paths will be created with their corresponding war files.
- de4a-commons
de4a-commons project is now on maven central OSS Sonatype repository
- Toop version v2.1.2-SNAPSHOT
Due to the lastest changes on de4a-commons Toop-connector-ng version should be 2.1.2-SNAPSHOT, so you may need to add following repo server on your maven settings
https://oss.sonatype.org/content/repositories/snapshots/
Connector configuration guide
For a correct configuration of the Connector, three main property files must be considered:
application.properties: main system configurationphase4.properties: AS4 gateway configurationslog4j2.xml: logging configuration
Bellow, a working example of the application.properties file:
# Database properties
database.datasourceConf.url=jdbc:h2:mem:testdb
database.datasourceConf.driverClassName=org.h2.Driver
database.datasourceConf.username=sa
database.datasourceConf.password=password
database.datasourceConf.initializationMode=always
database.datasourceConf.jpaHibernate.dialectPlatform=org.hibernate.dialect.H2Dialect
database.datasourceConf.jpaHibernate.ddlauto=create-drop
database.datasourceConf.jpaHibernate.generateddl=true
database.datasourceConf.jpaHibernate.namingStrategy=org.hibernate.cfg.ImprovedNamingStrategy
database.datasourceConf.jpaHibernate.showSql=true
database.datasourceConf.jpaHibernate.formatSql=true

# H2 in-memory database console port (default 21080)
h2.console.port=21080

# i18n properties
spring.messages.basename=messages/messages
spring.messages.default_locale=en

# Spring allowing override beans
spring.main.allow-bean-definition-overriding=true

# Charset encoding
server.servlet.encoding.charset=UTF-8
server.servlet.encoding.enabled=true
server.servlet.encoding.force=true

# SSL context enabled (true|false)
ssl.context.enabled=false

# SSL configuration (optional when ssl.context.enabled is false, otherwise, it must be configured)
#ssl.keystore.type=
#ssl.keystore.path=
#ssl.keystore.password=
#ssl.truststore.path=
#ssl.truststore.password=

# Global flags for initializer
global.debug = true
global.production = false

# Instance name for logging
global.instancename = dev-from-ide

# DE4A Kafka settings
de4a.kafka.enabled=true
# Enables the standard logging separately of the Kafka messages. It is necessary for print metrics messages - (default: true)
de4a.kafka.logging.enabled=true
# Enables Kafka connection via HTTP (Only enable HTTP mode if outbound TCP connections are blocked from your internal network)
de4a.kafka.http.enabled=false

# Kafka server address (Eg.: de4a-dev-kafka.egovlab.eu:9092)
de4a.kafka.url=de4a-dev-kafka.egovlab.eu:9092
# Uncomment the following property and remove the above one if HTTP mode is enabled
# de4a.kafka.url=https://de4a-dev-kafka.egovlab.eu

# Establish a topic on kafka tracker - Pattern: de4a-<country-code>-<partner-name> - Eg.: de4a-se-egovlab - (default: de4a-connector)
de4a.kafka.topic=de4a-connector

# Logging metrics messages prefix - Default: DE4A METRICS
log.metrics.prefix=DE4A METRICS

# toop legacy kafka properties (Do not touch)
toop.tracker.enabled = false

# DSD base URL (Do not modify)
toop.dsd.service.baseurl = http://dsd.dev.exchange.toop.eu

# What AS4 implementation to use?
toop.mem.implementation = phase4

# Our AS4 sending AP endpoint (holodeck)
#toop.mem.as4.endpoint = http://localhost:8083/tc-webapp/as4

# Domibus server endpoint
# domibus.endpoint=

# SMP Client configuration stuff - Do not modify (default values)
smpclient.truststore.type = JKS
smpclient.truststore.path = truststore/de4a-truststore-test-smp-pw-de4a.jks
smpclient.truststore.password = de4a

# Spring As4 gateway implementation bean(provided: phase4GatewayClient and domibusGatewayClient).Implements eu.toop.as4.client.As4GatewayInterface
as4.gateway.implementation.bean=phase4GatewayClient

# External endpoints
# SMP endpoint Eg.: https://de4a-smp.egovlab.eu/
smp.endpoint=
# IDK endpoint Eg.: https://de4a-dev-idk.egovlab.eu/
idk.endpoint=

# IM response timeout
as4.timeout.miliseconds=30000

# Properties to create the http client connection through a proxy (optional)
#http.proxy.enabled=
#http.proxy.address=
#http.proxy.port=
#http.proxy.non-proxy=
#http.proxyUsername=
#http.proxyPassword=

# Required renamed proxy configuration for BDXRClient (if is needed, only uncomment)
#http.proxyHost=${http.proxy.address}
#http.proxyPort=${http.proxy.port}
#http.nonProxyHosts=${http.proxy.non-proxy}
From now on, we will explain the main and most critical configuration.
Database properties
Regarding database configuration and structure, the component creates an in-memory database through an H2 DB Engine, which will be created and deleted on each execution.
- Datasource parameters
spring.datasource.url=jdbc:h2:mem:testdb
spring.datasource.driverClassName=org.h2.Driver
spring.datasource.username=sa
spring.datasource.password=password
spring.jpa.database-platform=org.hibernate.dialect.H2Dialect
spring.datasource.initialization-mode=always
spring.jpa.hibernate.ddl-auto=create-drop
spring.jpa.generate-ddl=true
On the previous properties you also can specify any driver o connection configuration in order to stablish the connection to any database engine.
- H2 in-memory database console
In order to access and manage information stored, until an external environment is created, the Connector expose H2 server engine console on the port defined by the property:
h2.console.port=21080
By default, even if you do not define the property (non-empty), port will be 21080, so you will be able to access through the following direction pattern:
http://<host-endpoint>:<portH2Console>
SSL Context (not for AS4) application.properties
You can configure secure HTTP connections from the Connector by setting the following property to true:
# SSL context enabled (true|false)
ssl.context.enabled=true
In this case you should properly configure the following properties in order to create an SSL context for HTTP communications:
- SSL configuration (optional when ssl.context.enables is false)
ssl.keystore.type= #(JKS|PKCS12) ssl.keystore.path= #(Path to keystore where signing private key are included) ssl.keystore.password= #(Private key password) ssl.truststore.path= #(JKS truststore) ssl.truststore.password= #(Truststore password)
In the case that you disabled the SSL context property, you should configure the corresponding JVM parameters to specify the truststore, keystore, etc. or the further actions depending of your environment configuration.
Kafka configuration application.properties
To send log messages to a Kafka server, configure the following parameters:
# DE4A Kafka settings
de4a.kafka.enabled=true
# Enables the standard logging separately of the Kafka messages. It is necessary for print metrics messages - (default: true)
de4a.kafka.logging.enabled=true
# Enables Kafka connection via HTTP (Only enable HTTP mode if outbound TCP connections are blocked from your internal network)
de4a.kafka.http.enabled=false

# Kafka server address (Eg.: de4a-dev-kafka.egovlab.eu:9092)
de4a.kafka.url=de4a-dev-kafka.egovlab.eu:9092
# Uncomment the following property and remove the above one if HTTP mode is enabled
# de4a.kafka.url=https://de4a-dev-kafka.egovlab.eu

# toop legacy kafka properties (Do not touch)
toop.tracker.enabled = false
IMPORTANT - If your server has no access to external domains, the HTTP Kafka and proxy configuration should be enabled. To enable HTTP Kafka log producer, you only need to set the property to true de4a.kafka.http.enabled=true - Also configure the proper endpoint in order to use HTTP connections.
An important setting is to set the de4a.kafka.topic to something that distinguishes your service from all the others. A good naming convention for your topic would be de4a-<two letter country code>-<pilot/partner acronym>.
It is important to mention the property de4a.kafka.logging.enabled, used to enable the file log printing for each Kafka message sent, that property could be enabled even when the de4a.kafka.enabled=false, just for write the log at the different appenders configured in the log4j2 configuration file.
SMP properties application.properties
To establish which SMP server will provide the Connector with metadata services, the following properties must be used:
# SMP Client configuration stuff - Do not touch (default values)
smpclient.truststore.type = JKS
smpclient.truststore.path = truststore/de4a-truststore-test-smp-pw-de4a.jks
smpclient.truststore.password = de4a
..........

# External endpoints
smp.endpoint=
You can define there your SMP endpoint and truststore which will be used to validate the signature of the responses.
Do not modify, all consortium SMPs should be validated with the default truststore.
Starting up the Connector
Once you have all configuration parameters well configured (if not, check the logs to find out the problem), it is time to deploy the component into an applications server. Once you have deployed the war file or the docker image, there are several checks to ensure that the deployment was successful:
- Open Swagger UI browsing:
http://host:port/swagger-ui/
E.g.:
- DE4A Connector index page will be at root path:
http://host:port/
E.g.:
- The Connector will be able to process requests through the following interfaces:
- Accessing to in-memory database:
http://host:h2.console.port/