DE4A SSI Authority and Edge Agent
Introduction
The SSI Agent infrastructure is established through the use of the SSI Authority and Edge agents. The SSI Authority Agent is an enterprise-level solution to be deployed on the premises of organizations that act as diploma Issuers (Data Providers) or Verifiers (Data Consumers), while the Edge Agent is a mobile solution, which can be used by the end users (in case of the SA pilot, students) to interact with the Authority Agent.
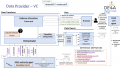
Conceptual view of the DP technical flow.
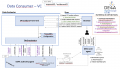
Conceptual view of the DC technical flow.


SSI Authority Agent
Functionalities provided
The main purpose of the SSI Authority Agent is to provide functionalities related to establishing a DID connection between the Hyperledger Aries agent deployed on the organization's premises and the user's Edge Agent as well as issuing the user's diploma as a Verifiable Credential (Data Provider) or request and validate the submitted diploma in the form of a Verifiable Presentation (Data Consumer). The Authority Agent also facilitates the communication with EBSI ledgers for storing the information about the trusted diploma issuers and their EBSI-compliant DIDs used for digitally signing the issued verifiable credentials and validating the issuers of submitted verifiable presentations.
Generate and issue an EBSI-compliant DID for the organization
In order to digitally sign verifiable credentials for the users, which can later be validated by the Verifier, the DID used for signing must be trustworthy and publicly available. To achieve this, the information about organizations listed as trusted diploma issuers and their DIDs is anchored to EBSI ledgers, where it can be accessed by calling the DID and Trusted Issuers Registry REST APIs. This information is produced on the Authority Agent startup by the underlying EBSI Connector component, which makes sure that the necessary keys are generated and imported to the cloud HL Aries agent, so that they can be used to sign the verifiable credentials. During the VP validation, the Authority Agent is then able to retrieve and resolve the DID information from the EBSI ledgers to validate the diploma issuer.
Establish DID connection between agents
The first step necessary in the diploma issuance/submission flow is to establish a secure connection between the Evidence Portal/eProcedure Portal and the user's Edge Agent (i.e. digital wallet). This is done by generating a QR code to be displayed on the portal side, which includes information about the DID invitation generated by the Authority Agent. The user can use his/her mobile application to scan the QR code and accept the DID invitation. Once this is done, a DID connection is established between the two agents (specifically, between the two HL Aries agents in the background). This step is a pre-condition needed to uniquely identify the two agents that will echange messages in the later flow.
Issue a Verifiable Credential
Once deployed on the Data Provider side, the Authority Agent supports the process of issuing a diploma in the form of a Verifiable Credential (VC) digitally signed with an EBSI-compliant DID of the Issuer. The VC information is retrieved from the received diploma evidence data in the canonical XML format. Sending the Verifiable Credential produced by the Authority Agent includes sending the VC offer for the user to preview the included data, followed by actually sending the Verifiable Credential once the offer is accepted.
Receive and validate a Verifiable Presentation
If deployed on the Data Consumer side, the Authority Agent enables organizations to request a diploma in the form of Verifiable Presentations from the students. In that case, a student can directly submit his/her diploma from the mobile wallet to the eProcedure Portal. Once received, the Portal can validate several aspects of the diploma validity: schema, digital signature, issuer and subject.
Supported interaction patterns
Interaction patterns define the flow of data through the Connector and the intercommunication between the different components. Each pattern exchanges certain types of messages, and the incoming/outgoing information will depend on the processes occurring in the external components [3].
The SSI Authority Agent currently supports the following interaction pattern:
- Verifiable Credentials (VC) pattern
- Synchronous communication between the SSI Authority and Edge Agent.
- The Mediator component enables the correct routing between multiple Edge Agents (multiple users) and the Authority Agent deployed on DR or DT premises.
- Since the interaction flow is managed by the user, the Data Requestor does not need to communicate directly with the Data Owner.
SSI Authority Agent roles
A SSI Authority Agent instance can play two different roles:
- Data Requestor (DR)
- Data Transferor (DT)
No configuration is needed to differentiate the roles, it only depends on the usage, i.e., the behaviour will be according to the messages sent.
Error handling
The Authority Agent includes methods monitoring the communication between the REST API and the Aries agent and internal database, and it records produced log messages into an internal log file for easier metric monitoring (the de4a-metrics-log.txt file is automatically created in the /usr/local/tomcat/logs in the AA API Docker container). During each API request, the Authority Agent records error messages to the log file along with the information about the component that generated the message, the internal code and description of the message.
Logging messages
Message types
The Authority Agent implements a custom DE4A Logger, which is responsible for producing a pre-defined format of the log message. The Logger provides the following types of messages:
- Info
- Error
Those basic message categories are used to record success or failure of individual operations executed within each API method call.
List of messages
The messages currently logged by the Authority Agent are as follows:
Services – (Info level)
- {0}: Received input eIDAS user data.
- {0}: Received input userId data.
- {0}: Generated DID invitation for edge agent.
- {0}: Received input evidence data.
- {0}: Signed a Verifiable Credential.
- {0}: Sent a Verifiable Credential to the edge agent.
- {0}: Accepted a submitted Verifiable Presentation.
- {0}: Decoded input eIDAS user data.
- {0}: Validated the digital signature of the submitted VP.
- {0}: Validated the subject of the submitted VP.
- {0}: Received HTTP response code: {1} from endpoint: {2}.
- {0}: Processing the JSON response received from /{1}.
- {0}: Stored current state in {1} internal database.
- {0}: Received user {1} status data.
- {0}: Converted input evidence in format: {1} to format: {2}.
- {0}: Received response data PIID: {1}.
- {0}: Found a {1} action match with PIID: {2}.
- {0}: Found a Verifiable Presentation with name: {1}.
- {0}: Found a Verifiable Presentation with ID: {1}.
- {0}: Issuer DID has already been generated and registered in EBSI.
- {0}: Successfully created files for EBSI integration.
- {0}: Successfully generated key: {1}, value: {2}.
- {0}: Successfully exported JWK private key.
- {0}: Successfully imported DID document into Aries.
Errors – (Error level)
The following list of error messages are recorded on the Communications, Internal failure and Configuration layers:
- Connection error with {0} - {1}
- Error on response from {0} - {1}
- Arguments missing or invalid at {0} - {1}
- Object conversion error on {0} - {1}
- Error accessing/saving data on {0} - {1}
- Error generating {0} key.
- Error exporting JWK private key.
- Error importing DID document into Aries.
- Configuration error occurred on {0}.
[1] The {x} symbols are placeholders for dynamic text to be logged.
Data management
The Authority Agent stores and manages certain information about the DID connections with students' mobile wallets, VC/VP status (e.g. VC offer sent, accepted/rejected, VP request send, VP received, etc.) and its internal EBSI-compliant DID(s).
Technology used
SSI Authority Agent
System core architecture
The SSI Authority Agent includes several Docker containers necessary for successfull installment (HyperLedger Aries, CouchDB, Aries webhooks, REST API, etc.), where the Authority Agent REST API is the component responsible for the communication between the Evidence/eProcedure portal and the HL Aries agent. The API is implemented as a standalone Java EE application deployed as a WAR file to the Docker container. The application is built with the following tools:
- Maven
- Java EE 16
Third party libraries
To achieve its functionality, the Authority Agent uses some external, third-party libraries explained in the folowing paragraphs.
Walt.ID library
The Walt.ID library is an open-source library for implementing self-sovereign identity functionality. It comes with a set of shared utility functions, whereby the Authority Agent (AA) uses the functions necessary to interact with the EBSI registries through EBSI/eSSIF APIs (generating EBSI-compliant DID, onboarding the DID into the EBSI DID Registry, checking if the diploma issuer is registered in the EBSI Trusted Issuer Registry). The library is used both by the EBSI connector (component of the Authority Agent running on the AA REST API startup) as well as directly by the AA REST API during the diploma validation.
- Author: Walt.ID (recently open-sourced)
- Repository: [1]
Jackson
Set of Java libraries to parse JSON data when building Java web applications.
- Author: open-source
- Repository: [2]
Data management
To manage the model and the data stored by the SSI Authority Agent the following technologies are used:
- Ektorp: A Java Persistence API that used CouchDB as the underlying storage engine. It is used to persist data between Java objects and the CouchDB database.
Edge Agent
System core architecture
The SSI Edge Agent works as standalone mobile device application that runs different components to implement SSI approach. The application is built with Android Studio using Kotlin language.
Installation and configuration
SSI Authority Agent
Installation
The installation guidelines are available at https://github.com/de4a-wp5/ssi-authority-agent.
SSI Authority Agent configuration guide
For a correct configuration of the Connector, three main property files must be considered:
.env: main system configuration (Aries agent, public IP address and ports, CouchDB database)docker-compose.yml: general script for deploying the SSI Authority Agent containersapp.properties: main configuration of the REST API i.e. web application (database credentials, EBSI bearer token, HL Aries agent public address and port)
Bellow, a working example of the app.properties file:
db.ip.address=http://couchdb.de4a.eu:5984/
db.username=<INSERT DB administrator username>
db.password=<INSERT DB administrator password>
db.name=<INSERT DB name>
alias=<INSERT ORGANIZATION ALIAS NAME>
aries.enterprise.ip.address=http://<INSERT_PUBLIC_DOMAIN_HERE>:8082/
signature.type=Ed25519Signature2018
bearer.token=<INSERT session token>
From now on, we will explain the main and most critical configuration.
Database properties
Regarding database configuration and structure, the component creates an in-memory database through an H2 DB Engine, which will be created and deleted on each execution.
- Datasource parameters
spring.datasource.url=jdbc:h2:mem:testdb
spring.datasource.driverClassName=org.h2.Driver
spring.datasource.username=sa
spring.datasource.password=password
spring.jpa.database-platform=org.hibernate.dialect.H2Dialect
spring.datasource.initialization-mode=always
spring.jpa.hibernate.ddl-auto=create-drop
spring.jpa.generate-ddl=true
On the previous properties you also can specify any driver o connection configuration in order to stablish the connection to any database engine.
- H2 in-memory database console
In order to access and manage information stored, until an external environment is created, the Connector expose H2 server engine console on the port defined by the property:
h2.console.port=21080
By default, even if you do not define the property (non-empty), port will be 21080, so you will be able to access through the following direction pattern:
http://<host-endpoint>:<portH2Console>
SSL Context (not for AS4) application.properties
You can configure secure HTTP connections from the Connector by setting the following property to true:
# SSL context enabled (true|false)
ssl.context.enabled=true
In this case you should properly configure the following properties in order to create an SSL context for HTTP communications:
- SSL configuration (optional when ssl.context.enables is false)
ssl.keystore.type= #(JKS|PKCS12) ssl.keystore.path= #(Path to keystore where signing private key are included) ssl.keystore.password= #(Private key password) ssl.truststore.path= #(JKS truststore) ssl.truststore.password= #(Truststore password)
In the case that you disabled the SSL context property, you should configure the corresponding JVM parameters to specify the truststore, keystore, etc. or the further actions depending of your environment configuration.
Starting up the SSI Authority Agent
Once you have all configuration parameters well configured (if not, check the logs to find out the problem), it is time to deploy the component into an applications server. Once you have deployed the war file or the docker image, there are several checks to ensure that the deployment was successful:
- Open Swagger UI browsing:
http://host:port/swagger-ui/
E.g.:
- DE4A Connector index page will be at root path:
http://host:port/
E.g.:
- The Connector will be able to process requests through the following interfaces:
- Accessing to CouchDB database:
http://host:h2.console.port/
Edge Agent
Installation
To install the Edge Agent, it is necessary to install the DE4A Mobile App in a mobile device.
Requirements
To install the DE4A Mobile app in a mobile device, these are the requirements needed:
- Android Operating System installed (version android 9.0 or superior)
- Recommended 2Gb RAM and 1Ghz processor
- Fingerprint reader
Steps
- Download The apk is available here: https://github.com/de4a-wp5/de4a-mobile-app
- Set-up Once the app is downloaded, tap on the apk file to open it. The Android device will prompt for allowing apps from an unknown sources to be installed.

Allow apps from unknown source

The user has to tap on “Settings” button and the settings menu will appear with the following option for allowing the apps installation from this source, and to turn off this setting after the installation:

User guide
The user manual can be found here: https://github.com/de4a-wp5/de4a-mobile-app/blob/master/DE4A%20Mobile%20App%20Manual%20v0.2.pdf